
I have a TomTom GO 920t there are a few things that bother me. I have a 920t /currently running Navcore 8.01 and the newest north american maps.
My Background:
I work for an alphabet agency. I spend countless hours on surveillance and travelling to arrest badguys and take their contraband. I can say for the most part the 920 is great. However their are a few things that cause me concern and will prompt me to sell the TT and get a Garmin.
The 920 has all the Bells and whistles. I love the map share feature but the biggest problem I see right now is that TT is running off Tele Atlas. Tele Atlas maps are not as accurate as Navteq. I hear a lot of people saying their are limitations to both providers but I can tell you that in my experience that is not true. Tele Atlas is not as good on the West Coast.
It has been my experience that Navteq and Tele Atlas bring back similar results in established neighborhoods but in new places Tele Atlas has some problems. The address/block information is off. So if you search for an address that is not well established you could be 1/2 mile away from where you need to be.
Which is why the TT POI database is filled with errors. I just got the new maps and attempted to put in new POI's "By address." Doing so places the POI about 1/2 mile away from the actual location. I conducted a search of POI's in the Database and learned that 7/10 poi's in that area were off by almost a 1/2 mile. (The POI's appeared to be in the middle of the dessert). It's not the device. It's Tele Atlas. Was easy to figure out. I used Yahoo maps (Navteq) and Google Maps (Tele Atlas) to search for the same address. They were off by almost 1/2 a mile.
Don't believe me try it yourself (758 S Watson rd, Buckeye, Arizona) type it in your TT or google you get sent to rattlesnake land. Type it in Yahoo maps / Garmin you get the right location.
I'm not bashing the TT. The device is great. The tele atlas maps the TT's are based on are off at least where I was trying to put these POI's in.
I will say this, the new maps and IQ routing makes a big difference on routing. Understand that I have a government issued Garmin Nuvii 205 that I compare the routes to on a daily basis. With IQ routing the TT's routes in my local area are very close to the routes I would drive on a daily basis. The Nuvii 205 routes are not as good as the TT with IQ but are better than the TT's without IQ. (I know quality of routes are subjective. This is just my opinion based on about 90-100 routes travelled).
So here is my summary. If TT finds the address. My experience has been that it will get you there using the best route. Again this is compared to a Nuvii 205 without traffic and without any advanced routing like what is found on the high end Nuvii's. I have always found the address using TT (100 or so trys) with one exception. I was searching for an address for a search warrant and put in the correct city and address. Unfortunately according to Tele Atlas I was not in the city of Goodyear I was in Buckeye. Well I didn't know that and I had no idea which city to search for because I'm not from that area. Caused me to have to get to the location with the assistance of another agent. Shoudn't ever have that problem when I have a GPS not a deal breaker though I just have to realize the limitations of the search engine. Didn't have the Garmin then so I couldn't compare.
The POI database is where the Garmin 205 is leaps and bounds ahead of the TT. I'm not certain how many POI's the 205 has preloaded. I can say this though I have never been driving in circles looking for a meet location since I picked up the Garmin it has always been spot on.
Two weeks ago a got the auto restart bug. Couldn't use the GPS until I came home and reloaded the OS, Maps and flashed the device. All is well now but I would have been PO'd if I needed to get to a meet or travelled out of town while it was bugging out like that.
Again I'm not down on the TT I'm just aware that there are some limitations. The mapshare function is absolutely awesome. There are a lot of things that make the TT a great device. I just think in a year or so when it's time to get a new device I'm going to test the waters with a high end Garmin.
And if this thing start bugging again Ebay and a new Garmin sooner than later. I can't afford to have an unreliable device.
Just my .02

HowTo: Add Itinerary Planning to TomTom ONE 3rd Edition
Here are instructions on how to restore the TomTom ONE 1st Edition main menu on the TomTom ONE 3rd Edition, allowing access to Itinerary Planning (which was something I really was disappointed TomTom chose to skip on the 3rd Edition). A lot of us got the ONE 3rd on Black Friday ($130) and were disappointed by how stripped down it was. While you can't get back SD and BlueTooth support, you can easily get back Itinerary Planning.
NOTE: THESE INSTRUCTIONS WILL ONLY WORK WITH TOMTOM 7.x. DO NOT UPGRADE TO 8.x OR ANY OTHER VERSION BEFORE OR AFTER APPLYING THIS MODIFICATION! If you do (like I did), your TomTom will freeze when turning on and will completely lock up and reboot when you try accessing Itinerary Planning. See the bottom of this post for details on how to un-break it if you accidentally upgrade. The fix is relatively simple.
Please remember that while this is not a hack (TomTom actually explains how to perform menu and POI customization in their SDK documentation) and it does not void your warranty, you should still proceed at your own risk, since we are transferring files to the TomTom unit. Never unplug your TomTom while files are transferring. And always remember to make backups. So now that's out of the way, let's start:
1) Open WordPad, NotePad, or some other simple text editor of your choice and copy and paste the following block of text (this restores the TomTom ONE 1st Edition menu). You can customize this menu and add and sort your own tasks however you like. See http://opentom.org/Menu_structure for details.
MENUBLOCK|BLOCK_MAIN|BTM_DONE|
MENUPAGE|TASK_PAGE1|Main Menu 1 of 2|
MENUITEM|TASK_NAVIGATE_TO|
MENUITEM|TASK_MENU_FIND_ALTERNATIVES|
MENUITEM|TASK_DELETE_ROUTE|
MENUITEM|TASK_ADD_FAVORITE|
MENUITEM|TASK_MENU_PREFERENCES|
MENUITEM|TASK_PAGE2|
MENUPAGE|TASK_PAGE2|Main Menu 2 of 2|
MENUITEM|TASK_MENU_PLAN_ATOB|
MENUITEM|TASK_SHOW_MAP|
MENUITEM|TASK_MENU_ROUTE_INSTRUCTIONS|
MENUITEM|TASK_SHOW_ROUTE_DEMO|
MENUITEM|TASK_ITINERARY|
MENUITEM|TASK_PAGE1|
2) Save the file as TomTom.mnu (case sensitive). Make sure no additional extensions are added to the file name! You don't want TomTom.mnu.rtf or TomTom.mnu.txt. By default, Windows does not show extensions of known file types, so it's easy to make a mistake here.
3) Plug in your TomTom ONE 3rd to your computer via the included USB cable, turn it on, and tap Yes, when it asks you if you want to connect to your computer, and then (through your computer) create a new folder in the root directory of your TomTom called SDKRegistry (case sensitive).
4) Upload the file TomTom.mnu to SDKRegistry. Once the upload is complete, unplug the USB cable after safely preparing the TomTom (either through HOME, click Device > Disconnect Device, or through Windows, right click on Safely Remove Hardware icon and click Safely Remove Hardware). Itinerary Planning should be in the same location (page 2) on the Main Menu as it was on the TomTom ONE 1st Edition.
These instructions will disallow access to a few features on the 3rd that you may want (don't worry, it's easily reversible). So you might want to tweak this menu a bit depending on what you use. Tweaking menus will not remove any features (like MapShare), it simply changes the menus and doesn't let you access the features not included in the menu. And it's not a hack. It's a customization, so it won't void your warranty.
Here's a few pics showing my TomTom ONE 3rd Edition with Itinerary Planning working:


-How to undo this-
Just plug in your TomTom and delete the SDKRegistry directory.
-How to customize menu more easily-
Visit http://www.skux.net/tomtom/menubuilder2/index.php, select your language flag on the top (default is German), and then follow the instructions on that page to customize the menu. You can also download a program that's very similar to this site at http://www.gregoryduncan.com/ttmd/index.php.
-How to custimize the menu manually-
OpenTom.org has a list of menus available for the Go (most are compatible with ONE as well) on their wiki at http://opentom.org/Menu_structure
-I accidentally upgraded to version 8.x and now my TomTom freezes when I try to access Itinerary Planning-
This was annoying, but thanks to forum member tendawolf, it's a simple fix:
1) Go to your My Documents folder and navigate to TomTom\HOME\Download\Program\ and delete the version 8 folder. If you don't have the version 7.x folder there, you can download it at
http://www.savefile.com/files/1677339 or http://www.minihost.org/kubel/TomTom_Application_for_ONE_3RD_Edition.zip
2) Make sure you perform a backup just in case something goes wrong. If you aren't worried, you will at least want to back up MapSettings.cfg from the map folder, as this will be overwritten and you will lose all your favorites when you go back to 7.x. Once you finish all these steps, you will want to re-upload your MapSettings.cfg back to the map folder on your TomTom. (Thanks dhn).
3) Plug your TomTom into your computer via the USB cable, turn it on, and tap "Connect" when it prompts you to connect to your computer.
4) Open TomTom Home if it doesn't automatically start. DO NOT INSTALL ANY UPDATES. Instead, click "Back".
5) Go to "Add Maps, Traffic, Voices, etc..." on the TomTom Home main menu.
6) Click the More arrow (about 3 times) and go to "Items on my computer".
7) Click the + sign next to Applications. "TomTom Application for ONE 3RD Edition" should show up. Click on "More info..." to verify that the version number is 7.x (7.116 if you downloaded the version from these instructions). If it is correct, click the "Add" button.
8) Let it finish and follow the instructions on the screen. (It should tell you to unplug your TomTom, let it restart, plug it back in, and click "Connect"). Once the blinking accessing icon disappears the the "do-not-unplug" picture disappears, it should be safe to unplug and give it a test. Several things will be reset, including the following: Language, home location, colors, voice, history (including recent POIs, auto-fill, and city buoyancy where it places most often used cities toward the top), favorites, keyboard, and probably a few other preferences and settings.
9) If you backed up any files, now would be a good time to restore them. Please note that some files that were compatible with v8.x may not be with v7.x.
10) Last, but not least, do not update "TomTom Application" ever again! You can install other updates, though.
credit:gpsreview.net
An Inexpensive External GPS Antenna (Part 2)
Following previous article
An Inexpensive External GPS Antenna (Part 1)
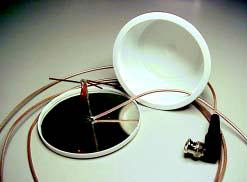
Final Assembly
I’ve found that an empty, upturned 8-ounce cream cheese container makes a practical radome for the antenna. More importantly, it helps protect the internalworkings from mechanical damage.
I usually don’t paint the container but I do remove the silk-screened label by using an automotive rubbing compound. It takes some effort but it does come off. Just follow the manufacturer’s instructions. Be careful not to apply too much pressure to the lid when you rub the label off. It’s made of a different plastic than the container and stretches easily.
You should be able to snap the base plate into the lid of the container. It’s a tight fit so just work your way around the lid until the entire base plate is flush with the lid bottom You might have to cut a notch in the lip of the lid to allow the coax to exit the unit cleanly. Carefully align the coax with the lid notch and snap the cover onto the lid. It’s normal for the top of the transmission line assembly to slightly raise the “bump” on the container bottom.
Theory of Operation
In a normal turnstile, we would have a double dipole configuration with both dipoles on the same plane but rotated 90° from each other. Additionally, the second dipole is fed 90° out of phase with an other ¼ wavelength of coaxial cable. This creates some difficult assembly problems since you would have to isolate the second dipole section from ground while maintaining the tight distance and spacing requirements. Due to the size constraints, this second dipole connection would require a very small diameter coax that might be difficult to work with and even harder to obtain. With this antenna, we cheat a bit and use a selfphased quadrature type feed.
To obtain circular polarization without a coaxial phasing line, the shorter dipole is cut so its impedance is 50 – j50 Ω. The longer dipole is fashioned into an inverted V shape and cut so its impedance is lowered to 50 + j50 Ω. With the combined asymmetrical dipoles and with them spaced slightly closer than ¼ wavelength to the ground plane, the antenna’s impedance is near 50 Ω with a much more omnidirectional pattern, an important consideration for reception of GPS satellites close to the horizon.
You should see an improvement over the supplied stock antenna. You can tweak the antenna by bending the wires up and down gently and watching the results on your GPS unit. Be careful of the solder joint—it’s rather fragile. Adjust for maximum displayed signal. Repositioning the

antenna may also improve reception. With this antenna, I routinely receive five to eight satellites on my Garmin II receiver. If you are using a GPS unit that sends dc voltage volts up the coax to power an external preamp or amplified antenna, don’t worry. Since the elements are not grounded or shorted, there is no dc path. Just be careful not to let either end of the active elements touch ground.
[Be advised that some GPS receivers with internal patch antennas have an antenna switching circuit. This circuit disables the internal antenna when an amplified external antenna is attached. The receiver senses current flow that is intended to power the amplifier of the external antenna.
If your receiver has this feature, you will want the switch to activate and disable the internal patch antenna. Placing
1 kΩ to 5 kΩ across the ground and center conductor of the coax should be sufficient. Check with the manufacturer of your GPS receiver.—Ed.]
If you are mobile, most GPS receivers will do a fair job of receiving signals through the windshield of a car. During the
summer, however (and especially out here in the Southwest), the GPS gets baked while sitting in the hot sun.
Obviously, one way to solve this problem is to locate the receiver somewhere cooler and place this external antenna on the dash. Once that’s done, you’ve protected your expensive receiver while sacrificing a $10 antenna.
This design was not intended for outside use, hence the lack of external mounting suggestions. Any prolonged exposure to the elements will degrade the antenna’s unprotected metal parts. My suggestion—if you plan on using this unit outside, at least spray the metal parts with clear lacquer and seal the exposed coax end with RTV. Otherwise, don’t waste a lot of time weatherproofing it. Because these antennas are so cheap and easy to build, if one does deteriorate throw it away and build another. Perhaps you might want to keep a couple of spares on hand, just in case.
An Inexpensive External GPS Antenna (Part 1)
Final Assembly
I’ve found that an empty, upturned 8-ounce cream cheese container makes a practical radome for the antenna. More importantly, it helps protect the internalworkings from mechanical damage.
I usually don’t paint the container but I do remove the silk-screened label by using an automotive rubbing compound. It takes some effort but it does come off. Just follow the manufacturer’s instructions. Be careful not to apply too much pressure to the lid when you rub the label off. It’s made of a different plastic than the container and stretches easily.
You should be able to snap the base plate into the lid of the container. It’s a tight fit so just work your way around the lid until the entire base plate is flush with the lid bottom You might have to cut a notch in the lip of the lid to allow the coax to exit the unit cleanly. Carefully align the coax with the lid notch and snap the cover onto the lid. It’s normal for the top of the transmission line assembly to slightly raise the “bump” on the container bottom.
Theory of Operation
In a normal turnstile, we would have a double dipole configuration with both dipoles on the same plane but rotated 90° from each other. Additionally, the second dipole is fed 90° out of phase with an other ¼ wavelength of coaxial cable. This creates some difficult assembly problems since you would have to isolate the second dipole section from ground while maintaining the tight distance and spacing requirements. Due to the size constraints, this second dipole connection would require a very small diameter coax that might be difficult to work with and even harder to obtain. With this antenna, we cheat a bit and use a selfphased quadrature type feed.
To obtain circular polarization without a coaxial phasing line, the shorter dipole is cut so its impedance is 50 – j50 Ω. The longer dipole is fashioned into an inverted V shape and cut so its impedance is lowered to 50 + j50 Ω. With the combined asymmetrical dipoles and with them spaced slightly closer than ¼ wavelength to the ground plane, the antenna’s impedance is near 50 Ω with a much more omnidirectional pattern, an important consideration for reception of GPS satellites close to the horizon.
Operation
Connect the antenna to the GPS receiver and watch the signal-strength indicator.You should see an improvement over the supplied stock antenna. You can tweak the antenna by bending the wires up and down gently and watching the results on your GPS unit. Be careful of the solder joint—it’s rather fragile. Adjust for maximum displayed signal. Repositioning the


antenna may also improve reception. With this antenna, I routinely receive five to eight satellites on my Garmin II receiver. If you are using a GPS unit that sends dc voltage volts up the coax to power an external preamp or amplified antenna, don’t worry. Since the elements are not grounded or shorted, there is no dc path. Just be careful not to let either end of the active elements touch ground.
[Be advised that some GPS receivers with internal patch antennas have an antenna switching circuit. This circuit disables the internal antenna when an amplified external antenna is attached. The receiver senses current flow that is intended to power the amplifier of the external antenna.
If your receiver has this feature, you will want the switch to activate and disable the internal patch antenna. Placing
1 kΩ to 5 kΩ across the ground and center conductor of the coax should be sufficient. Check with the manufacturer of your GPS receiver.—Ed.]
If you are mobile, most GPS receivers will do a fair job of receiving signals through the windshield of a car. During the
summer, however (and especially out here in the Southwest), the GPS gets baked while sitting in the hot sun.
Obviously, one way to solve this problem is to locate the receiver somewhere cooler and place this external antenna on the dash. Once that’s done, you’ve protected your expensive receiver while sacrificing a $10 antenna.
This design was not intended for outside use, hence the lack of external mounting suggestions. Any prolonged exposure to the elements will degrade the antenna’s unprotected metal parts. My suggestion—if you plan on using this unit outside, at least spray the metal parts with clear lacquer and seal the exposed coax end with RTV. Otherwise, don’t waste a lot of time weatherproofing it. Because these antennas are so cheap and easy to build, if one does deteriorate throw it away and build another. Perhaps you might want to keep a couple of spares on hand, just in case.
Subscribe to:
Posts (Atom)


